As a leader in email security, MDaemon was the first windows based email server to adopt the DKIM protocol in 2005. In fact, Arvel Hathcock, the founder of ALT-N Technologies (now MDaemon Technologies), was part of the team that created the DKIM framework.
DomainKeys Identified Mail (commonly referred to as DKIM) is an email sender authentication method used to protect against the modification of emails when they are being sent between email servers and verifies that the email was sent and authorized by the owner of the sending domain.
In a nutshell, DKIM is a cryptographic signing mechanism that uses a private/public key pair. MDaemon uses the private key to sign emails with a “DKIM Signature”. Any emails signed with DKIM will now have a “DKIM-Signature” header. The public key is entered in to your domain’s DNS configuration. A receiving email server will look up your public DKIM key and use this to verify the “DKIM-Signature” information that MDaemon added using the private key.
Sounds like a great security feature! How do I configure MDaemon to sign emails using DKIM?
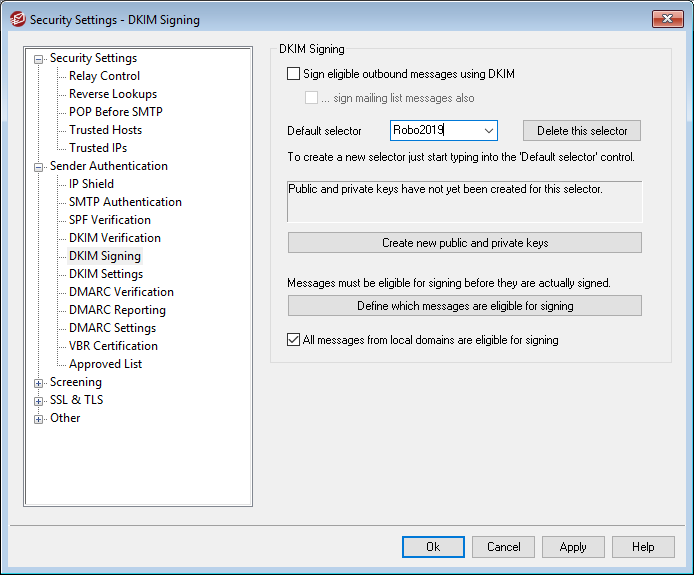
- Open MDaemon and click Security | Security Settings.
- Expand the Sender Authentication menu and click “DKIM Signing”
- In the “Default select” field remove “MDaemon” and type in a name for the selector. I like to add the year that the selector was created. Here I used part of the domain name with the year.
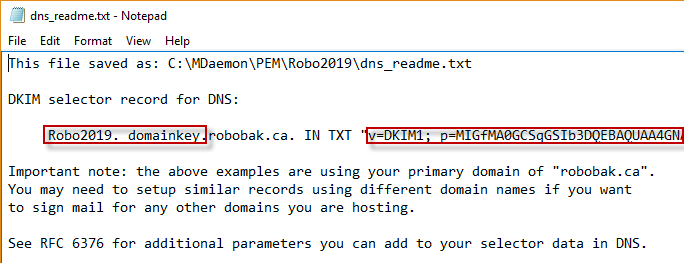
- Now click the “Create new public and private keys” button. This action opens a text file called “dns_readme.txt” that MDaemon stores in the \MDaemon\PEM\ folder. This is the public key that needs to be entered in to your domain’s DNS configuration as a TXT record. In this example when creating the TXT record you would add “Robo2019._domainkey” to the beginning of the domain name. The value of the TXT record is the information contained within the double quotes.
***NOTE: after you have created this DNS record you should now wait a couple of days for the records to propagate out. Waiting this time will ensure receiving email servers will be able to reliably lookup your public key you entered in to your domain’s DNS configuration. - After 2 days have passed go back to the DKIM Signing opens and place a check mark beside “Sign eligible outbound messages using DKIM” and “…sign mailing list messages also” (optional).
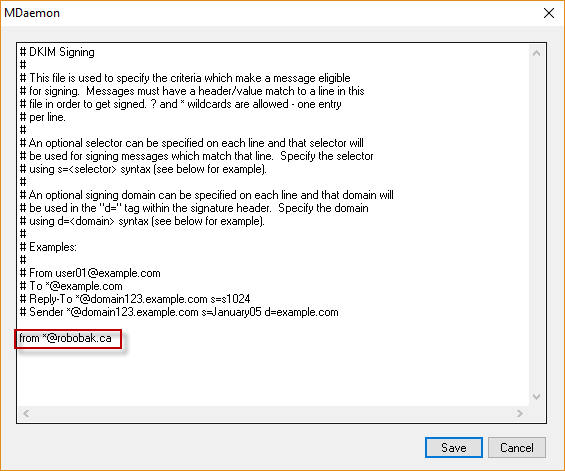
- Now we need to define which emails will be signed with DKIM. Typically, an entire domain’s emails will be signed using DKIM. Click the “Define which messages are eligible for signing” button. In the screenshot below I have elected to sign emails based on From header and I used a wildcard (*) to note the entire domain’s emails will be signed. Click Save when you are done.
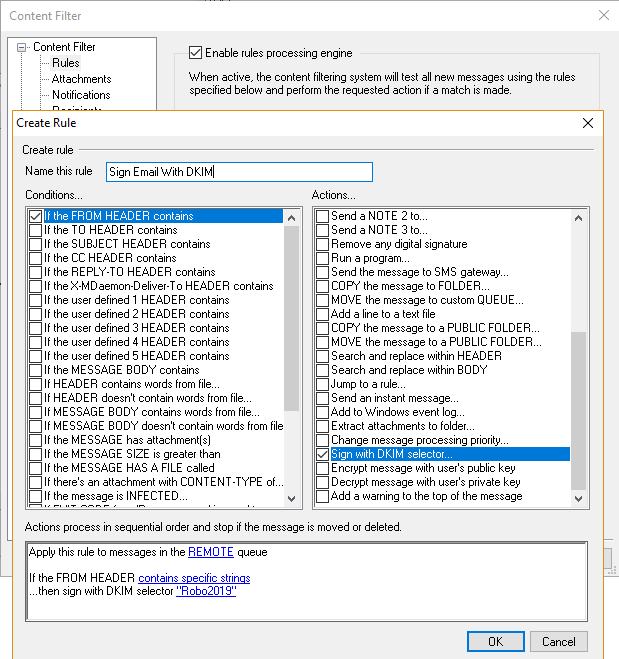
- Its good to note here that by default MDaemon will only sign an email with a DKIM signature that has arrived via an authenticated session. You will need to ensure that all your users have SMTP authentication enabled in their email client. Although the developers have added a content filter rule action to sign an email with a DKIM signature which comes in handy when you have a service that just can’t use SMTP authentication. The Content Filter is found under the Security menu in MDaemon.

How to test DKIM?
There are multiple web sites you can use to test your DKIM configuration. I’ve been using the DKIM Validator web site. They give you a unique random email address to send an email to and then you can view the results of the DKIM lookup by clicking the “View Results” button. Alternatively you can send an email to a Gmail or Yahoo email address and view the headers of the email to check whether or not the DKIM lookup passed or failed. There is a helpful website that shows how to view message headers on the Gmail and Yahoo web clients and shows what to look for in the header information.
